XX001 3 x 3 cm bases (square) These are used for the majority of Peter Pig rule systems. Usually infantry 40 Bases in a pack. £4.50
XX002 3x 4 cm bases (rectangular) Usually used for cavalry and equipment. 40 Bases per pack. £4.50
XX003 4 x 4 cm bases (square) These are usually used for guns and generals 10 Bases per pack £3
The famous Piggy Dice £6 Pack 0f 12 Choose colour All dice are 16mm size. Piggy on the 6.
16mm dice. Peter Pig first produced these dice with piggy head on the 6 (instead of the traditional 1 in 2003). Another innovation from Peter Pig.
Black (xx201)
Dark orange (xx202)
Orange (xx203)
Kawasaki green (xx204)
British racing (dark) green (xx205)
Blitzkrieg (dark) grey (xx206)
Spitfire (light) blue (xx207)
Mid blue (xx208)
Pink (xx209)
Ivory (xx210)
Yellow (xx211)
(XX004) Pair of choice dice 2 faces "I choose" 4 Faces blank. Used when a player wishes to choose the location of the casualties inflicted. Used in some Peter Pig rules. £1.50 per pair
Peter Pig 15mm figures Peter Pig is one of the world's leading 15mm figure manufacturers. We make 6000 different figures and models. These are distilled into 1800 (15mm) packs. Every range has an associated set of rules. Also, there are related 15mm scenery ranges to accompany the figure ranges. In these days of wandering measures of sizes into 18mm, 12mm and other sizes close to 15mm; Peter Pig has remained true to the 15mm ideal. These other sizes are often an attempt by a manufacturer to create a market for just their peculiar size. It is also used by sculptors who cannot work well with the 15mm size restriction and so need extra size in order to create acceptable sculpts. Peter Pig will continue to do 15mm wargame figures. We will also constantly return to each range in order to carry out updates and additions. Thus we have 15mm ranges with longevity and future potential.
M13/40 assembly
Firstly a thank you from Peter Pig for buying our products
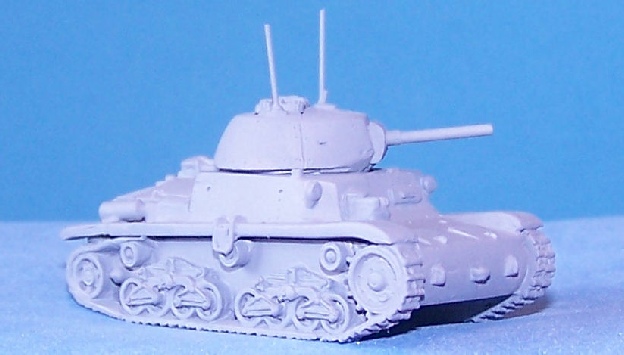
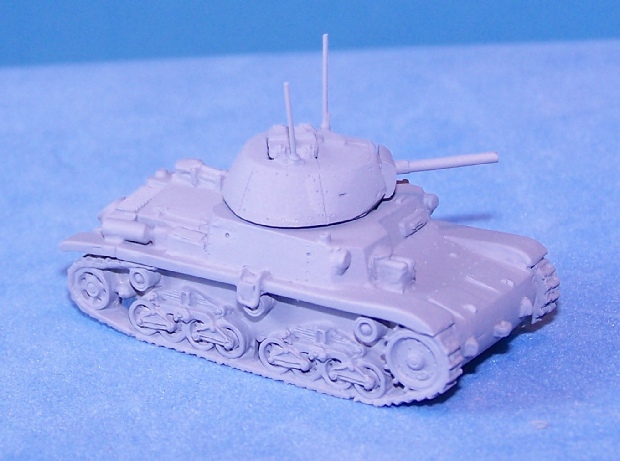
The M13/40 is the main Italian battle tank of WW2.
The components you have in this kit are:- Turret Hatch Commander Gun Hull Hull rear Two tracks
The kit is best put together with epoxy glue or super glue. Firstly trim off any excess metal caused by the filling channels. This should be done with a sharp knife. If you have time, it is also a good idea to scratch(key in) any surfaces that are going to be glued together. Fit and glue the rear hull unit to the main hull. Use the track mudguards as a guide to lining the parts up.
When this assembly has dried/set glue on the left and right track units.The left and right refers to the position as if you were driving the tank. Notice that the tracks taper out at the top of the track units. This is because the track was hidden within the long track guard and was not usually visible.
The turret has a gun assembly. The top of the gun mantlet has a recess to cover the join between gun and turret. Push the gun up high into the recess on the turret front.
The turret can either be made with the hatches closed or with a commander in place.
Lovely, all done.
This is a side view. Notice that the track units protrude until the track makes a constant curve with the front mudguard. The tracks taper into the mudguards. The aerials are just wire drilled into the turret points.
The gun mantlet pushes up to overlap the top of the turret face.
The rear hull unit overlaps the main hull with the cylindrical exhausts.